
Changing the user name on your Windows 10 or Windows 11 computer can make your PC feel more personal and up-to-date. Whether you misspelled your name during setup or you want to display a preferred name, there are multiple safe methods to change a Windows account name. As a certified technician at Esmond Service Centre – Singapore’s largest IT service provider with decades of experience – I’ve helped countless users manage their Windows accounts. In this guide, I’ll walk you through step-by-step instructions for each method. You’ll learn how to change a local account name using built-in tools like Control Panel and netplwiz, how to update your Microsoft account name, and more. Each solution is explained clearly, so you can confidently change your user name in Windows 10 or Windows 11 without hassle. (At Esmond Service Centre, we pride ourselves on professional yet friendly tech support – and this article reflects that approachable expertise.)
One of the simplest ways to change your user name in Windows 10 or Windows 11 is through the classic Control Panel. This method works for local accounts (the name you see on the sign-in screen) and is similar on both Windows 10 and 11. It provides a user-friendly interface to update your account’s display name.
Why use Control Panel? The Control Panel’s User Accounts section is a trusted method for renaming accounts. It directly updates the account’s display name in the system and is easy for any user to navigate. This method is great for local accounts on both Windows 10 and Windows 11, though note that Control Panel cannot change Microsoft-connected account names (it will instead direct you to Windows Settings in that case).
Step-by-Step (Windows 10 & 11):
Open Control Panel: Press <kbd>Win</kbd> + <kbd>R</kbd>, type control, and hit Enter to launch Control Panel. (Alternatively, search for “Control Panel” in the Start menu on Windows 10 or the search bar on Windows 11, then open it.)
Navigate to User Accounts:
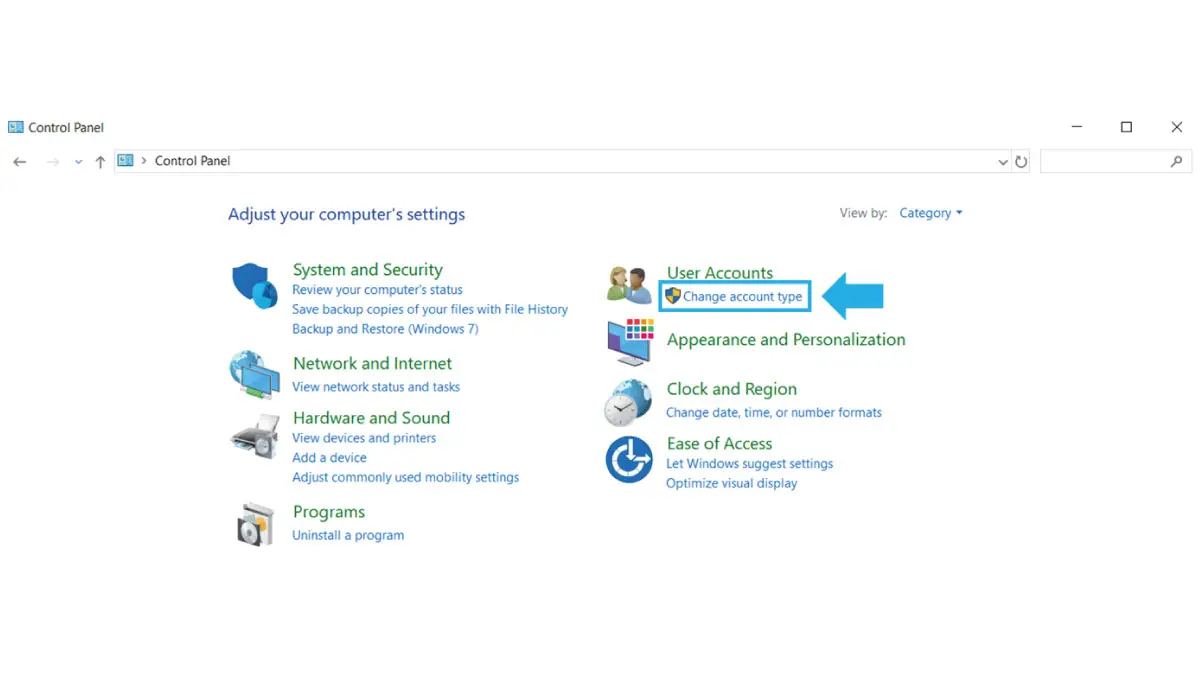
If Control Panel is in Category view (default), click on User Accounts, then click User Accounts again on the next page (in Windows 11, you may need to click “User Accounts” twice).
If in Icon view, find and click User Accounts.
Select the Account to Change: If you have multiple accounts on the PC, click Manage another account and select the account you want to rename. (Skip this if you are changing the name of the currently logged-in account and it’s already selected.)
Choose “Change your account name”: In the User Accounts panel, find the option that says Change your account name and click it. This will open a prompt or page to enter a new account name.
Enter the New Name: Type your desired new user name (for example, your corrected full name or a nickname) into the text field. Make sure it’s spelled exactly how you want it to appear on the login screen.
Apply the Change: Click the Change Name button to save the new name. Windows will update the account’s display name immediately.
Restart or Sign Out (if needed): In most cases, the name change will reflect right away. If you don’t see the change on the Start menu or login screen, try signing out of your account or restarting the computer. On the next sign-in, you should see the updated user name.
Using Control Panel’s User Accounts settings updates the account’s Full Name value in Windows. This means the new name will show on the Welcome/Sign-in screen and the Start menu. It’s a user-friendly approach because it doesn’t require any complex commands. Keep in mind that this method changes only the account’s display name, not the username folder under C:\Users. Your personal folder will still have the old name (changing that is more complicated and not recommended for most users). If a matching user folder name is crucial, consider creating a new account with the desired name.

Another effective way to change the user name on Windows 10 or 11 is by using the Netplwiz utility. Netplwiz is a legacy user account management tool that provides advanced options (it’s often used to manage login settings). This method is straightforward and works on both Windows 10 and Windows 11 for local accounts.
Why use Netplwiz? The netplwiz tool exposes user account properties in a single dialog. It allows you to edit the Full Name tied to an account quickly. This is useful if you’re comfortable with a slightly technical interface. It’s worth noting that while netplwiz lets you change even Microsoft-linked account names locally, those changes won’t stick for Microsoft accounts – the cloud will sync back the original name, so use netplwiz primarily for local accounts.
Step-by-Step (Windows 10 & 11):
Open Netplwiz: Press <kbd>Win</kbd> + <kbd>R</kbd>, type netplwiz, and press Enter. This opens the User Accounts dialog (netplwiz). You’ll see a list of user accounts on the computer.
Select the Account: In the Users tab, click to highlight the account you want to rename (e.g., your local user account).
Open Properties: Click the Properties button below the account list. This opens another window with details for that user.
Edit the User Name: In the Properties dialog, you’ll see fields for the account. If it’s a local account, you can directly edit the User name or Full name field:
For local accounts, enter the new name in the Full name field (this is the display name Windows uses). You can also change the “User name” (the shorter login name) if needed, but changing just the Full name is usually enough for display purposes.
(For Microsoft accounts, this field might be grayed out or any change here will be temporary – Microsoft accounts must be changed online, covered in a later section.)
Save Changes: Click Apply, then OK, and then OK again to close netplwiz dialogs.
Sign Out and In: Sign out of your Windows account (or restart the PC) and sign back in. The sign-in screen and Start menu should now show the updated name associated with your account.
Why this works: Netplwiz modifies the same account properties as Control Panel, updating the account’s full display name in the system settings. It’s essentially another route to edit the account information, favored by power users. This method is effective for local accounts – once changed via netplwiz, the new name will appear on the login screen and in the Start menu. However, for Microsoft accounts, netplwiz is not effective long-term. If you try it, the name might revert after the next sync, because Windows pulls the name from your online Microsoft profile. Therefore, use netplwiz for local accounts, and for Microsoft accounts, proceed to the dedicated method below.
If you have Windows 10/11 Pro, Enterprise, or Education, you can use the Local Users and Groups management console (within Computer Management) to rename an account. This is a slightly more advanced method, but it gives you direct control over user account properties. (Note: This snap-in is not available in Windows Home editions. Home users should use the other methods in this guide.)
Why use Local Users and Groups? This tool (lusrmgr.msc) is essentially the “professional” way to manage user accounts and can change the account name at a deeper system level. It’s especially useful if you’re an administrator managing multiple accounts. Renaming through Local Users and Groups is very straightforward and achieves the same result — changing the account’s full name — as other methods.
Step-by-Step (Windows 10/11 Pro or higher):
Open Computer Management: Press <kbd>Win</kbd> + <kbd>R</kbd>, type lusrmgr.msc (for “Local User and Group Manager”), and hit Enter. This opens the Local Users and Groups console inside the Computer Management app.
(If this command doesn’t work or you get an error on Windows Home, then this method isn’t supported on your edition — skip to another method.)
Navigate to Users: In the left sidebar, expand System Tools, then expand Local Users and Groups, and click on Users. You’ll see all user accounts listed on the right.
Open User Properties: Find the account you want to rename in the list. Double-click that username, or right-click it and choose Properties. This opens the account properties dialog.
Change the Name: In the Properties window’s General tab, there will be a field for Full name (this is the display name). Enter the new name you want for the account in the Full name field. (You can ignore the “User name” field here if you’re only changing the display name. The “User name” is the actual account login name – changing it can have other implications, so typically you only change the Full name.)
Apply and Close: Click Apply then OK to save the changes and close the dialog.
Sign Out/Restart: Sign out from the account or restart your computer. The next time you reach the sign-in screen, the account will be shown with the new name you set.
Why this works: This method directly edits the user account object in Windows. By updating the Full name in the account’s properties, Windows will display that new name everywhere the account name appears (such as the login screen). This is effectively the same outcome as the Control Panel or netplwiz methods, but done through a more administrative interface. It’s a reliable way to change an account name on professional versions of Windows. As with other methods, this does not change the actual account folder name under C:\Users (which is tied to the original username). Changing the folder name is more complex and not advised, as it can cause problems if not done perfectly.
If you log into Windows 10 or 11 with a Microsoft account (email address), the displayed user name is pulled from your online Microsoft profile. In this case, renaming the account requires a different approach: you need to change your name on your Microsoft account itself. Once changed, Windows will sync the new name to your PC.
Why update the Microsoft account name? For Microsoft accounts, local tools (Control Panel, netplwiz) won’t permanently change your sign-in name because Windows will always sync with your Microsoft profile. By changing it online via Microsoft’s settings, you ensure the new name propagates properly across all devices and services (your Windows login, Outlook, OneDrive, etc.). Essentially, you’re telling Microsoft “this is my new name,” and Windows will reflect that change.
Step-by-Step (Windows 10 & 11 Microsoft account users):
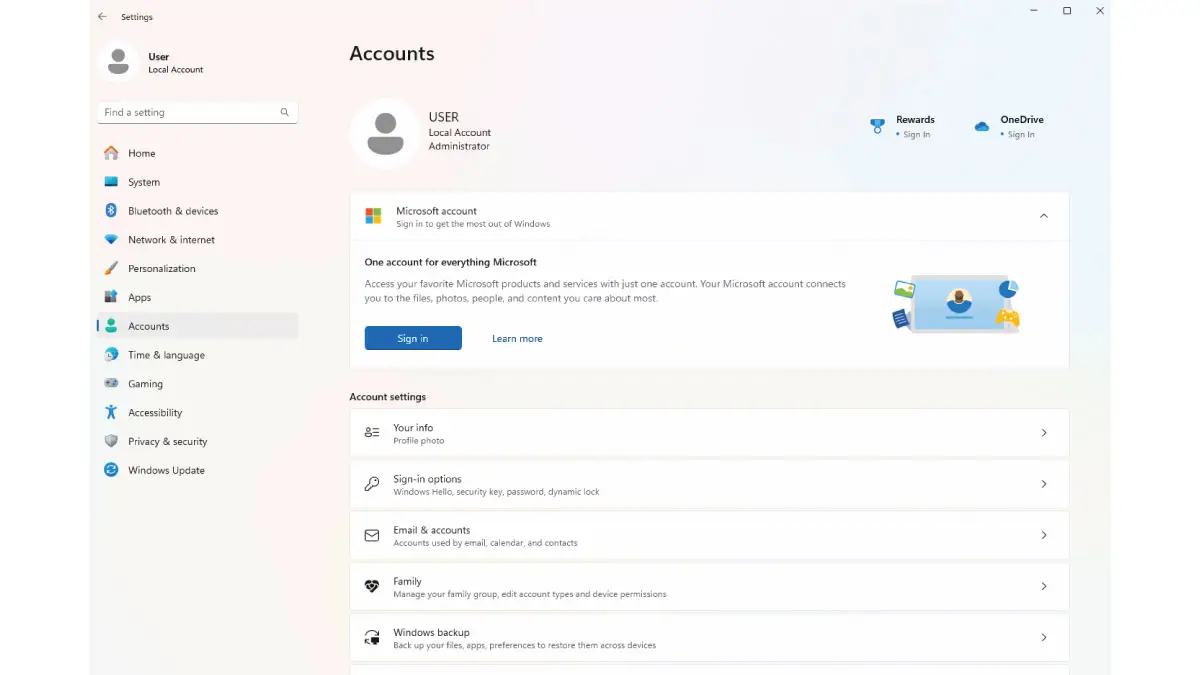
Open Windows Account Settings: On your PC, go to Settings -> Accounts -> Your Info. (In Windows 10, click Manage my Microsoft account; in Windows 11, you might see a similar link like Accounts (Manage my accounts).) Click the link to manage your account online – this will open your web browser to the Microsoft account profile page.
Sign In to Microsoft (if prompted): Your default browser will take you to the Microsoft account website. Log in with your Microsoft account email and password if you aren’t already logged in.
Go to “Your Info” on Microsoft’s site: Once on your account page, find the section labeled Your info (usually at the top menu). This page shows your profile information, including your current name and profile picture.
Edit Your Name: Look for an Edit name link or button near your name (on Microsoft’s site it might be under your name or in a menu). Click Edit name. Microsoft will present fields for “First name” and “Last name”.
Enter New Name and Save: Input your desired first and last name. For example, change “Jonathan Doe” to “John Doe” or to a nickname if you prefer. You may need to fill out a CAPTCHA to verify the change. Then click Save to update your Microsoft account profile name.
Allow Sync to Update Your PC: After saving, give it some time. Your Windows 10/11 PC should automatically sync the new name from the cloud. You might need to sign out and sign back in or restart your computer to see the change take effect on the Windows sign-in screen. Once synced, your login screen will show the updated name.
Why this works: Windows 10 and 11 use your Microsoft account information for display when you’re using an online account. By changing your name on the Microsoft account website, you’re essentially telling all your devices to use the new name. Windows will then show this updated name on the sign-in screen and in the Settings app. This method ensures consistency across services – for instance, your new name will also appear in Outlook emails or Xbox profile if those use the same Microsoft account. Tip: If you don’t see the change immediately, double-check that the new name saved on the website, and ensure your PC is connected to the internet to sync the update. Logging out of Windows or rebooting forces the system to fetch the latest account info.
For advanced users comfortable with command-line tools, Windows provides a way to rename a local account using Command Prompt. This method uses the WMIC (Windows Management Instrumentation Command-line) utility. It’s a powerful method but use it with caution: you must type commands exactly, and it’s only for local accounts (not Microsoft accounts).
Why use Command Prompt? In scenarios where the other graphical methods aren’t available or if you prefer scripting, the command line offers a quick solution. It’s actually doing the same thing under the hood – modifying the account’s name property – but through a textual interface. This can be useful, for example, in Windows 11 Home (which lacks the Local Users and Groups GUI) or if you want to batch rename accounts on multiple machines using a script.
Step-by-Step:
Open Command Prompt as Administrator: Click the Start button, type “Command Prompt”, right-click it and choose Run as administrator. Running with admin privileges is required to change user accounts.
List the User Accounts (Optional): To see the exact account names, you can type:
and press Enter. This will display all user account login names on the system. Identify the account you want to rename from this list. If you want to see full display names too, you can run:
to list each account’s full name and login name.
Rename the Account: Use the following command, replacing the placeholders with your account names:
Here, OLDNAME is the current login username of the account (exactly as listed in step 2), and NEWNAME is the new login name you want to give it. Example: if the account’s login name is john and you want to change it to johnny, you would type:
and press Enter.
Wait for Confirmation: If the command is successful, you’ll get a confirmation message or just a new prompt line with no error. The account’s login name (and its full display name, if it was a local account) is now changed.
Restart and Log In: Close the Command Prompt and reboot your PC. On the sign-in screen, you should now see the account with the new name. Use the new username to log in (your password will remain the same).
Why this works: The wmic useraccount where name="X" rename "Y" command directly tells Windows to find the local user account with the specified login name and rename it. This updates the account at a system level, just like the other methods. Upon restart, Windows will show the new name. This method is powerful but remember it’s intended for local accounts.
Do not use this for Microsoft accounts, as it will not have the desired effect (Microsoft accounts will revert to the cloud name). Also, be careful with spelling and spacing in the command. If the account name contains spaces, you might need quotes around it. Using the listing command (step 2) helps confirm the exact account name to use. This method is mostly for tech-savvy users; for most people, the earlier graphical methods are safer and easier.
Changing your Windows account name is easier than it may sound, and now you have multiple methods at your fingertips. In summary, Windows 10 and Windows 11 offer both graphical tools and advanced options to update your user name. If you’re a casual user, the Control Panel method or netplwiz utility provides a quick, friendly way to change a local account name. For those on Pro editions, the Local Users and Groups console is a direct and efficient route for renaming accounts in a business or multi-user environment. And if you’re using a Microsoft account login, we covered how updating your profile online will sync a new name to your PC, ensuring consistency across all Microsoft services. Lastly, the Command Prompt method stands as a powerful option for advanced users comfortable with text commands.
No matter which method you choose, the key takeaway is that your account’s display name can be changed without affecting your files or Windows license – it’s purely a cosmetic and convenience update. We encourage you to pick the method that matches your comfort level: try the Control Panel or Settings for a straightforward approach, or the advanced tools if you’re technically inclined.
Our community (and the team at Esmond Service Centre) is here to help. By following this guide, you’ve taken control of a small but significant personalization of your PC – and with our expert insights, you did it safely and effectively. Happy computing with your updated account name!
Enjoyed this comprehensive Windows username change tutorial? Follow our FaceBook page, Linkedin profile or Instagram account for more expert insights and practical tips on cutting-edge technology. Our team at Esmond Service Centre is always ready to share knowledge and help you get the most out of your devices. If you need personalized support or have any tech issues beyond this guide, don’t hesitate to contact Esmond Service Centre for professional consultation. We’re here to assist with all your IT needs, from simple tweaks to complex repairs – ensuring your technology works seamlessly for you.
Reviewed and originally published by Esmond Service Centre on June 28, 2025
Mon to Fri : 10:00am - 7:00pm
Sat : 10:00am - 3:00pm
Closed on Sunday and PH